
This tutorial is a follow-up from a previous tutorial posted. The same concept of this technique applies, but some numbers will differ here. If you would like to see the tutorial that this is tied to, you can view that by clicking HERE.
If you would like to continue with this tutorial to apply as you wish to your own clips, then please follow the steps below.
In this tutorial, I’ll be showing you how to create one of those awesome seemingly-continuous, never-ending video clips that you have probably seen around on the Internet at one point or another. They have become increasingly popular with the “plotagraph” effect on images.
STEP 1:
I think it should go without saying, but you will of course need to open your video clip that you wish to use. In this case, you will be using either the video clip created from the previous tutorial, or whichever one you may have already.

You will see it open up with (in this case) your 6-second clip in the video timeline.
STEP 2:
Over in your layers panel, you’ll want to select “Layer 1” and press Cmd+J (Mac) or Ctrl+J (Windows) to duplicate the video layer.

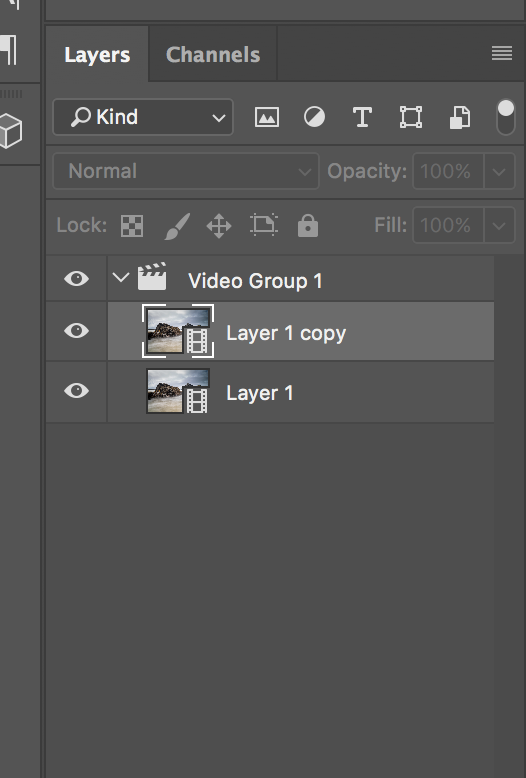
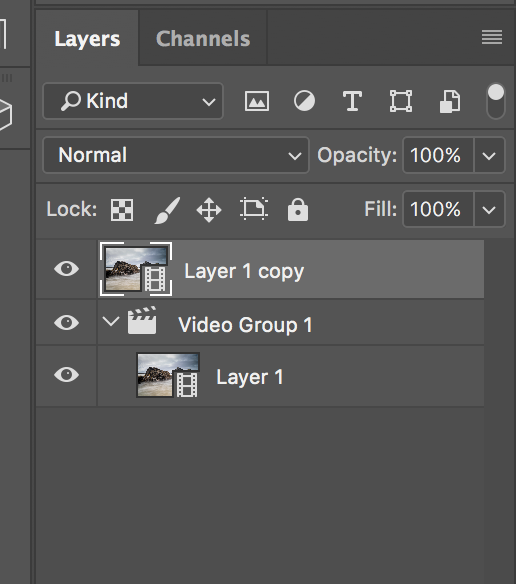
You will want to drag “Layer 1 copy” ABOVE THE VIDEO GROUP so that it creates its own layer in the video timeline.

Look at that fancy new layer. Place yourself directly in the middle (3 seconds) as shown here.
STEP 4:
Okay, here’s where it gets a bit strange. The reason I had you place the marker at 3 seconds, is so that we can easily identify the very middle of these clips (in this case, the 3 second mark.) You’ll want to begin by dragging the TOP CLIP in from the left, bringing the new starting point into the middle of the clip.

You will then want to do the opposite with the bottom clip, by dragging it in from the right so that the middle is now the end of the clip.

And finally, drag that top clip over so that both clips are parallel with each other.

STEP 5:
Here’s where this all begins to make sense! So remember how that bottom clip now ENDS IN THE MIDDLE, with the top clip STARTING in the middle? You’ll want to position the BOTTOM clip so that there is a 15 frame delay to begin, and it hangs 15 frames longer than the top clip. DO NOT resize the clip. Just drag it until you have this. You may need to zoom in to see the 15 frame mark.

STEP 6:
Now this is where it all comes together, like a magic…thing.
Click that little arrow on the TOP CLIP to show the drop down menu. You will see an option for OPACITY. At the BEGINNING of the BOTTOM clip, you’ll want to place your marker, and then hit the stopwatch on opacity to create a keyframe. What this does, is creates a keyframe telling Photoshop that you want this clip to start animating here at 100% opacity.


STEP 7:
Now, take your marker to the end of the TOP CLIP. Do not go past, or your ability to change opacity will not be available in your layers panel. To create a new keyframe, simply go over to your layers panel, and make sure your top layer – in this case “Layer 1 copy” – is selected, and drag the opacity down to 0%. This tells Photoshop that between keyframe #1 and keyframe #2, you want the opacity of this clip to drop steadily until finally hitting 0% to show the clip below. This gives the clip a smooth fade/transition to reveal the bottom clip’s final 15 frames, to arrive back at the top clip (which was originally that middle point) so it creates a seamless loop. Think about that thing outside of a lot of barber shops…it’s kind of like that…a sort of optical trick. I mean, this is a lot different…but similar kind of concept.


That’s it! You’re done. Export the video just as you had done in the previous tutorial.
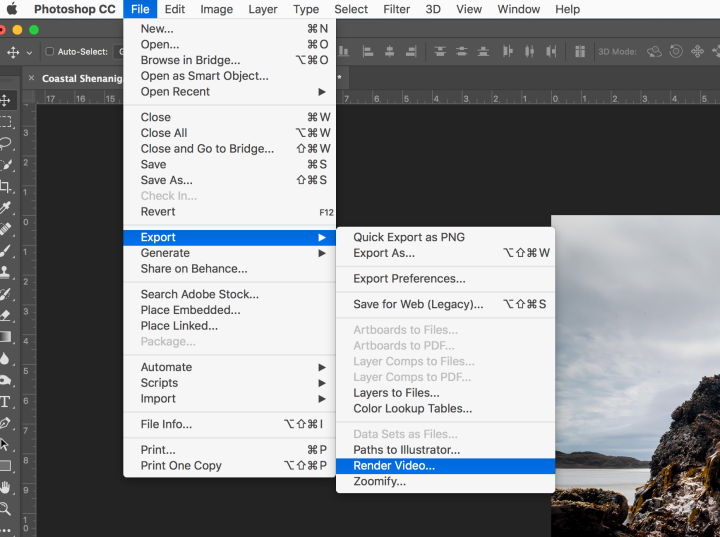
When I export, I like to keep all of the settings generally as default. I will only ever change the location where the file will be saved to.
